GUC Online 客戶操作手冊GUC Online User Guide
1. 登入系統1. Signing In
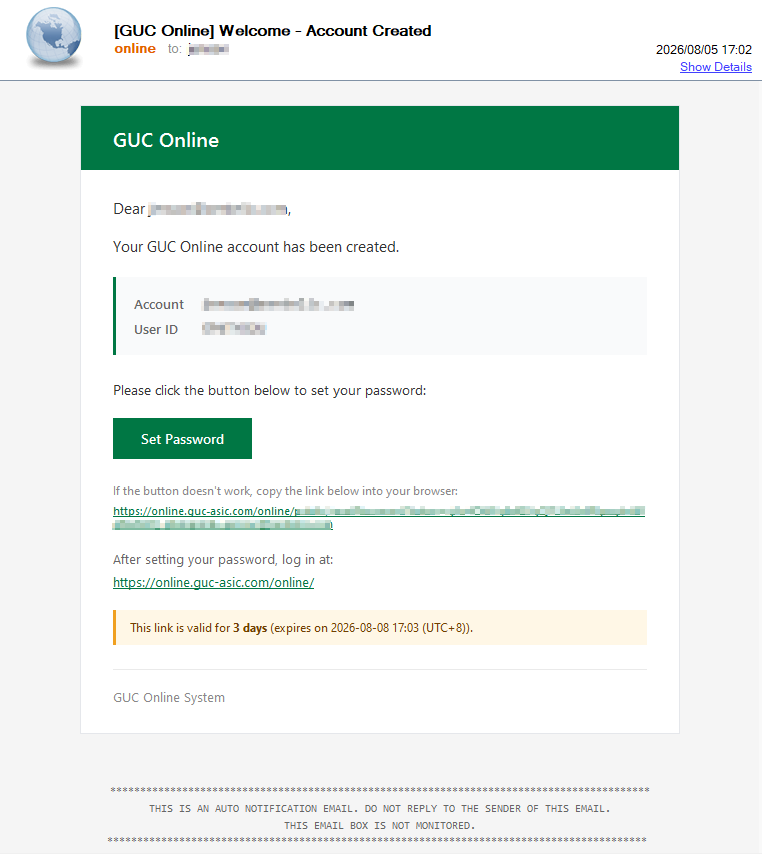
當您的帳號建立後, GUC Online 會先寄送 Welcome Email 至您註冊的信箱, 內含登入所需的資訊。 請依 Email 完成首次密碼設定, 再至登入頁完成登入。
Once your account is created, GUC Online sends a Welcome Email to your registered address with everything you need to sign in. Please complete the initial password setup via the email first, then sign in from the login page.
1.1 關於 Welcome Email1.1 About the Welcome Email
Welcome Email 內容包含以下資訊:
The Welcome Email contains the following:
| 項目Item | 用途Purpose |
|---|---|
| 您的登入信箱 (即為登入頁上「Email」欄位的值)Your login address (used in the "Email" field on the login page) | |
| User ID | 登入時的第二段驗證碼 (區分大小寫, 請完全依信中顯示輸入)Second-factor code required at sign-in (case-sensitive — enter exactly as shown in the email) |
| Set Password 按鈕Set Password button | 點擊後開啟密碼設定頁面, 完成首次密碼設定 Opens the password setup page to set your initial password |
| 登入 URLLogin URL | Welcome Email 底部同時附上系統網址, 方便您加入書籤The system URL is included at the bottom of the email so you can bookmark it |
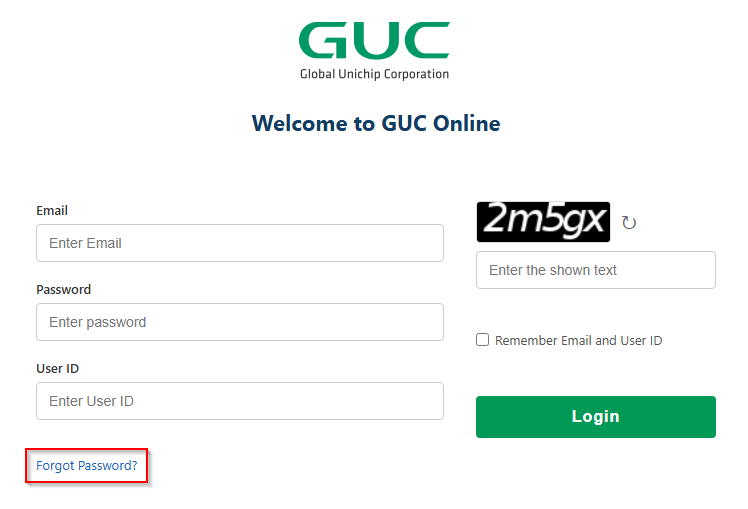
若連結過期, 請透過登入頁的「Forgot Password」重新申請 (詳見 3. 如何修改密碼)。
If the link has expired, request a new one via "Forgot Password" on the login page (see 3. Changing Password).
1.2 登入步驟1.2 Sign-In Steps
完成首次密碼設定後, 回到登入頁輸入以下四項資訊:
After completing the initial password setup, return to the login page and fill in these four fields:
填寫登入欄位Fill in the login fields
| 欄位Field | 說明Description |
|---|---|
| 您的登入信箱 (與 Welcome Email 內顯示相同)Your login address (same as shown in the Welcome Email) | |
| Password | 您於 Set Password 頁面設定的密碼The password you created on the Set Password page |
| User ID | Welcome Email 提供的個人 User ID (區分大小寫)Your personal User ID from the Welcome Email (case-sensitive) |
| Captcha | 依圖示輸入驗證碼Enter the code shown in the image |
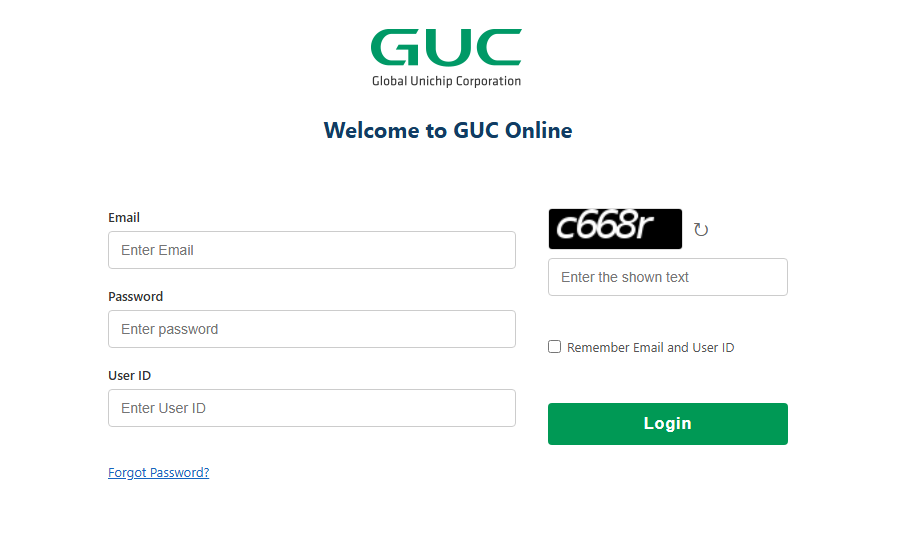
點擊「Login」按鈕Click the "Login" button
系統驗證通過後將自動導向報表首頁。
Once verified, you will be redirected to the reports home page.
2. 如何訂閱報表2. Subscribing to Reports
訂閱功能可讓您定期透過 Email 收到最新報表資料, 不需每次登入系統查看。
Subscriptions let you receive the latest report data by email on a schedule — no need to sign in every time.
2.1 新增訂閱2.1 Creating a Subscription
點擊上方選單「Subscribe」Click "Subscribe" in the top menu
登入後於首頁上方選單列找到 Subscribe, 點擊進入訂閱管理頁。
After signing in, find Subscribe in the top menu bar on the home page and click to enter the subscription management page.
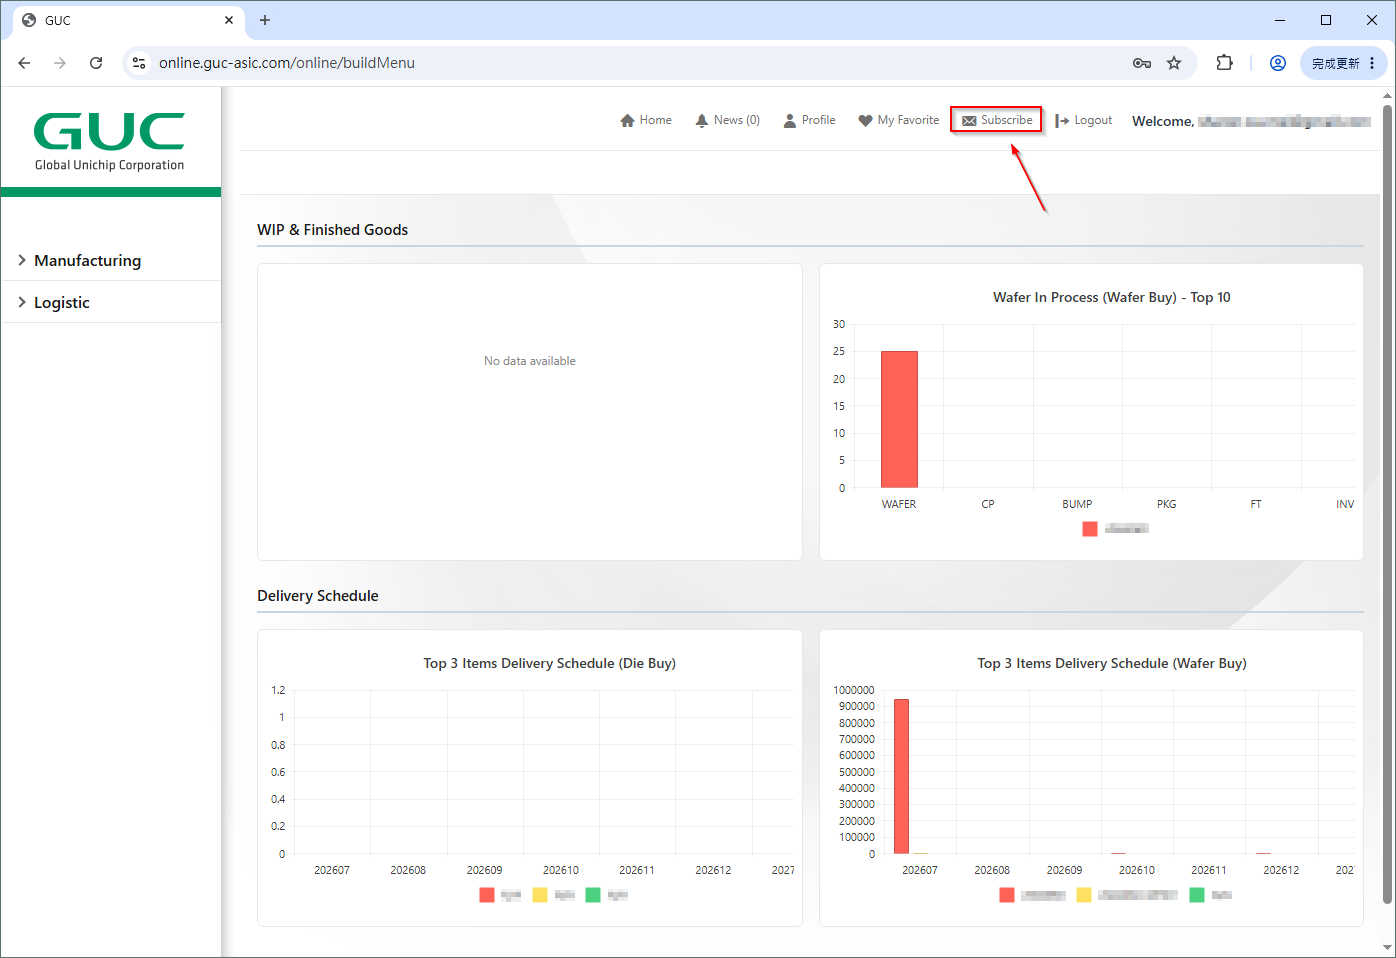
點擊「New Subscription」開啟設定視窗Click "New Subscription" to open the settings dialog
訂閱管理頁會顯示您目前已訂閱的所有項目 (若為初次使用則為空)。
The subscription management page lists all your current subscriptions (empty if this is your first time).

設定訂閱參數Configure subscription settings
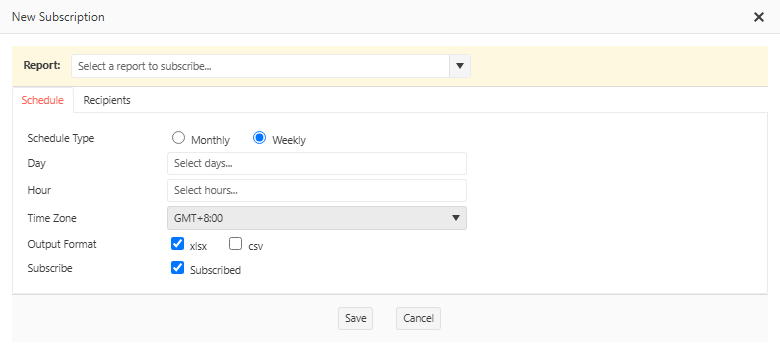
在跳出的 New Subscription 視窗上方選擇 Report (欲訂閱的報表), 下方分頁完成設定:
In the New Subscription dialog, select the Report to subscribe to at the top, then configure the tabs below:
- Schedule — 排程 (何時寄送)
- Recipients — 收件人 (寄給誰)
- Query Parameters — 報表篩選參數 (選 Report 後才會出現)
- Schedule — when to send
- Recipients — who receives it
- Query Parameters — report filters (appears after a Report is selected)
📅 分頁 1: Schedule (排程設定)Tab 1: Schedule
| 欄位Field | 說明Description |
|---|---|
| Schedule Type | Monthly 每月 / Weekly 每週Monthly / Weekly |
| Day | 寄送日 (Monthly: 每月幾日 / Weekly: 星期幾)Send day (Monthly: day of the month / Weekly: day of the week) |
| Hour | 寄送時間 (24 小時制)Send time (24-hour format) |
| Time Zone | 時區, 預設 GMT+8:00Time zone, defaults to GMT+8:00 |
| Output Format | 附件格式: xlsx / csvAttachment format: xlsx / csv |
| Subscribe | 勾選 Subscribed 啟用訂閱 (未勾選則為停用狀態)Check Subscribed to enable (unchecked = disabled) |
✉️ 分頁 2: Recipients (收件人設定)Tab 2: Recipients
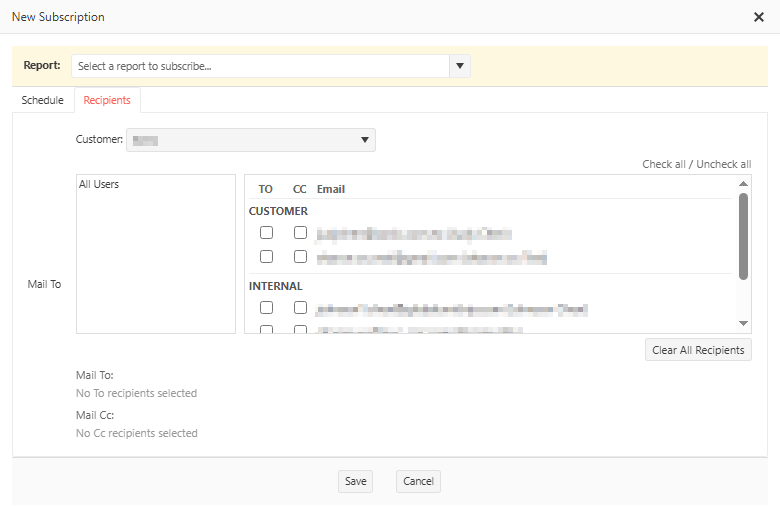
於 Mail To 區塊從 CUSTOMER / INTERNAL 分組清單勾選收件人:
In the Mail To section, select recipients from the CUSTOMER / INTERNAL groups:
- TO 欄 — 主要收件人
- CC 欄 — 副本收件人
- TO column — primary recipients
- CC column — carbon-copy recipients
🔍 分頁 3: Query Parameters (報表篩選參數)Tab 3: Query Parameters
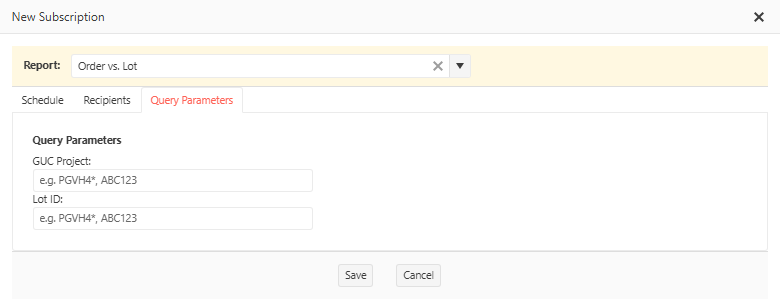
選定 Report 後, 此分頁才會出現。 內容因報表而異, 用於指定欲寄送的資料範圍。
This tab appears only after you select a Report. Fields vary by report and define the data range to send.
*; 若欄位空白則不篩選。
*; empty fields mean "no filter".
點擊「儲存 (Save)」完成訂閱Click "Save" to complete
系統將於下次符合時間點自動寄送報表至您註冊的 Email。
The system will automatically send the report to your registered email at the next scheduled time.
2.2 修改訂閱2.2 Editing a Subscription
回到 Subscribe 訂閱管理頁, 每筆訂閱右側 Setting 欄有 🔧 扳手圖示, 點擊即可開啟編輯視窗修改訂閱設定。
Return to the Subscribe management page. Each subscription has a 🔧 wrench icon in the Setting column on the right — click it to open the edit dialog.

Subscribed 即可停止寄送, 訂閱設定會保留供未來重新啟用。
Subscribed — the settings are kept for future re-activation.
3. 如何修改密碼3. Changing Password
本節說明兩種密碼修改情境:
This section covers two password-change scenarios:
- 忘記密碼 — 透過 Forgot Password 流程重設
- 密碼到期 — 系統強制要求變更密碼
- Forgot Password — reset via the Forgot Password flow
- Password Expired — the system requires you to change it
情境一: 忘記密碼Scenario 1: Forgot Password
於登入頁點擊「Forgot Password」On the login page, click "Forgot Password"
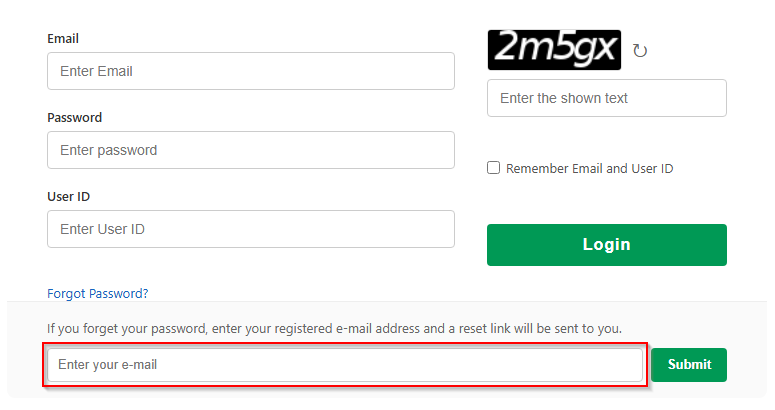
輸入您的 EmailEnter your email
系統將寄送重設密碼連結至您註冊的 Email。
The system will send a password reset link to your registered email.
檢查 Email 收件匣Check your inbox
您將收到主旨為 [GUC Online] Reset Password 的 Email。
You will receive an email with subject [GUC Online] Reset Password.
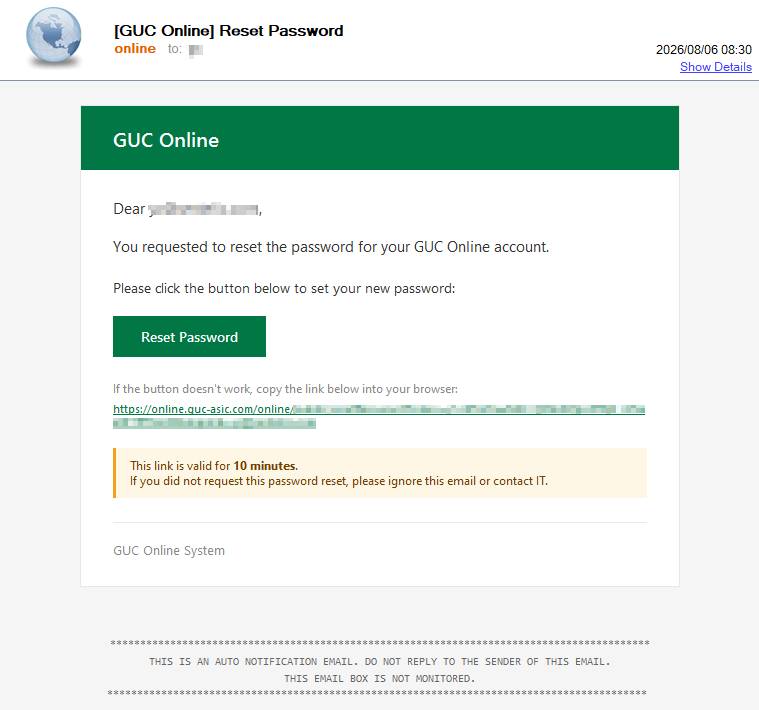
[GUC Online] Reset PasswordReset Password email — subject [GUC Online] Reset Password點擊 Email 內「Set Password」按鈕Click the "Set Password" button in the email
連結將導向密碼設定頁面。
The link takes you to the password setup page.
設定新密碼Set a new password
於 Set Password 頁面輸入新密碼, 需符合以下規則:
On the Set Password page, enter a new password that meets these rules:
| 規則Rule | 說明Requirement |
|---|---|
| 最小長度Minimum length | 8 字元以上At least 8 characters |
| 包含大寫字母Uppercase letter | 至少 1 個 (A-Z)At least 1 (A-Z) |
| 包含小寫字母Lowercase letter | 至少 1 個 (a-z)At least 1 (a-z) |
| 包含數字Digit | 至少 1 個 (0-9)At least 1 (0-9) |
| 包含特殊字元Special character | 至少 1 個 (! @ # $ % ^ & * 等)At least 1 (! @ # $ % ^ & * etc.) |
| 不可重複No reuse | 不可與最近數次舊密碼相同Cannot match your recent previous passwords |
| 不可含帳號 / 姓名No login / name | 密碼不可包含您的登入 Email 或姓名Cannot contain your login email or name |
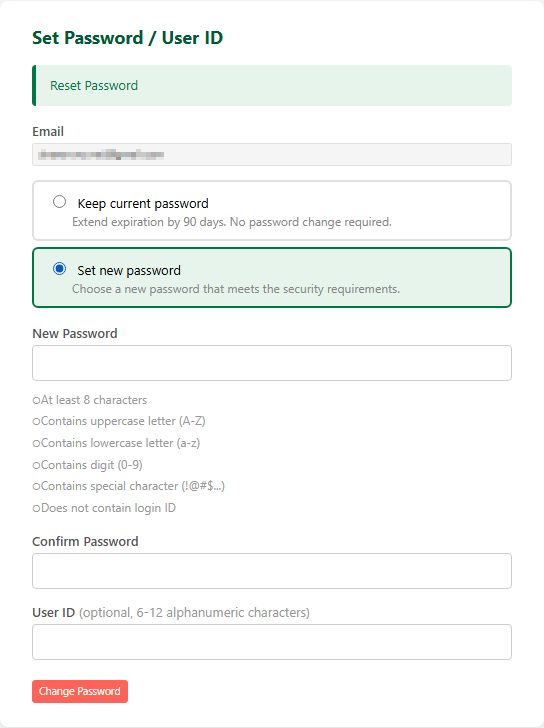
- 🟢 綠色 ✔ — 規則已通過
- 🔴 紅色 ✖ — 規則未通過
- ⚪ 灰色 ○ — 尚未輸入 / 未達檢查條件
- 🟢 Green ✔ — rule passed
- 🔴 Red ✖ — rule failed
- ⚪ Gray ○ — not yet entered / not evaluated
確認並儲存Confirm and save
再次輸入相同密碼於 Confirm Password 欄位, 點擊「Save」完成密碼變更, 即可使用新密碼登入。
Re-enter the same password in Confirm Password, click "Save" to finish, then sign in with the new password.
情境二: 密碼到期Scenario 2: Password Expired
依系統政策, 密碼具時效性。 若您的密碼已到期, 登入時會自動被導向密碼變更頁面, 提供兩種選擇:
Passwords have a limited lifetime per system policy. If yours has expired, sign-in redirects you to the password-change page with two options:
- Keep current password — 保留目前密碼並延長有效期 (無需變更)
- Change password — 設定新密碼 (流程同 設定新密碼 步驟)
- Keep current password — extend the expiration date without changing the password
- Change password — set a new one (same flow as Set a new password above)